Well this is all very exciting and quite a big deal for our little blog because I am a Simple Sew blogger! There are a number of us who have been added to the blogging list (Nelnanandnora, the Wardrobe Architect, Crafty Clyde and Coolarama) and we’re going to share some tutorials of Simple Sew’s patterns. First up for me are these gorgeous wide-legged trousers, or Palazzo trousers.

Fabric suggestions
You could use a number of different fabrics to make these trousers. I’ve gone for a 100% linen fabric in a duck egg blue from Fabworks online (here). It’s a medium weight fabric perfect for making trousers. You could also use gaberdine, double crepe or any fabric with drape. An evening pair in black, deep green, plum or midnight blue would look AMAZING!
Fabric and notions
You’re going to need:
- Up to 3m of 115cm (45″) wide fabric or up to 2.5m of 150cm (60″) fabric depending on your size.
- About 30cm fusible interfacing.
- Matching thread (get a couple of spools) and bobbins.
- 25cm (10″) zipper
- A regular zipper foot for your sewing machine
- Your usual dressmaking stuff – pins, tape measure, tailor’s chalk or air erasable pen, seam gauge or ruler, etc.
First things first…
WASH your fabric! A quick wash will do. You do not want it shrinking after you’ve made up your beautiful trousers. If you’re using a loose weave fabric like me, it may be worth overlocking or overcasting any raw edges so your fabric doesn’t fray in the wash. Once dry, press your fabric and you’re ready to go!
Find your size
Measure yourself around your waist and hips. The pattern shows finished garment measurements not body measurements so choose your size appropriately. My waist is 31″ and if I cut the size 12 (waist = 31″) then I won’t be able to bend over or eat! So I’m choosing a size 14 and will be prepared to alter as necessary.
I will not be covering fitting alterations but if you are at all concerned about fit, make up a pair in some cheap fabric that you don’t mind trashing! Old bed sheets are ideal! For more information on trouser fitting there are many books and online resources that cover this.
Tracing the pattern and cutting out
If you want to keep your pattern for others, or you’re not sure what size you should be sewing, then trace your pattern. I usually use baking parchment, or if I’m tracing large pattern pieces I’ll use dressmaker’s tracing paper.
Fold your pressed fabric selvedge to selvedge, wrong sides facing you. Place your (traced and cut out) pattern pieces and lay them according to the layout provided on the pattern envelope. Make sure the grainline arrows on the pattern pieces are parallel to the selvedge. The waist band pieces need to be placed on the fold. Pin your pattern pieces to the fabric or use pattern weights (large washers, baked bean tins, etc.) to hold the paper down.

Carefully cut around your pattern pieces.

Cut out waist band pieces from your fusible interfacing in exactly the same way as you did for your main fabric. Fuse the interfacing to your waistband pieces.
Marking notches and darts
There are a few notches on this pattern shown as little triangles on the edges. These are useful for matching up your fabric pieces later. Mark these notches on your fabric by making a small snip no more than 10mm into the fabric. This is well within the seam allowance. However, because I’m using a fabric with a very loose weave I’m going to cut triangular notches outside so my fabric does not fray.

There are only two darts (yay!) on this pattern and they are found on the back trouser pieces. I like to mark the ‘legs’ of the darts with little snips into the fabric and I mark the points with tailor’s tacks as it marks both pieces of fabric at the same time. The other advantage to these is that both sides of the fabric are marked and they can easily be removed without leaving any evidence they were ever there! Join the snips to the tailor tack point with a chalk line.

Marking the darts
Finishing seams
You must finish any raw edges of fabric to prevent them from fraying and ruining your beautiful garment. You may wish to go round each of your pattern pieces with a zig-zag or overcasting stitch before you start sewing. Just make sure you can see all your notches. My personal preference is to finish each seam after sewing. I will be using an overlocker to finish each seam after I’ve sewn them.
Let’s sew!
- The waistband – Finish the bottom edge of the waistband pieces. A zig-zag stitch or overcasting stitch is perfect. Or you can use an overlocker, or even bind it with bias tape! Right sides together (RST) pin the two waistband pieces together along the top edge. Stitch using a 1cm seam allowance.

Halve the seam allowance you have just sewn to 5mm. This will help to reduce bulk at the waistband.
Because the waistband is curved it may be a good idea to make tiny snips into the seam allowance making sure you do not cut into the stitching. This helps the waistband to sit nice and flat when you fold it up so that the right side’s facing you.

Snipping and folding!
Give the waistband a good press and set it aside.
2. Sew the darts – On the back trouser pieces, pinch the darts matching the snips. Pin the dart as shown below making sure your pins go through the chalk lines at the back and the front. Sew along the chalk line from your snips to the tailor tack point. Backstitch when you start to sew but just sew off the fabric when you get to the point and do not backstitch. Instead tie the threads into a knot and cut the thread.

Pinning the dart

Sew the dart along the chalk line
Press your darts towards the centre back. For more help on sewing darts check out this video tutorial.
3. Sew the trouser front – Take your front trouser pieces. Place them RST and pin along the crotch seam. I have drawn a stitching line to follow. I’m not very good at maintaining a 1.5cm seam allowance as I go round curves and I find marking the seam allowance helps with accuracy.

Sew this seam making sure you backstitch at the beginning and end of your stitching. This seam will have to take a lot of strain so sew the seam again to make it extra secure. As this seam is curved it will help to snip into the seam allowance (don’t cut your stitches!) to enable you to press the seam allowance flat.

Snipping into the seam allowance
Press the seam ‘as sewn’ to set the stitches then open up the seam allowances and press again.

Press clipped seam allowance open
Finish the seams if you haven’t already done so.
4. Sew the trouser back – For your back trouser pieces you may find it helpful to reinforce the area above the zip notch with a strip of fusible interfacing. I’ve chosen to do this because of the nature of my fabric. I’ve also drawn on the stitching line from the notch down.

Pin then sew the crotch from the notch to the bottom, backstitching at the start and finish. Sew the seam again to reinforce. To make it easier to install the zip later it is also helpful to tack the crotch seam all the way up to the top. You can use a machine basting stitch (the longest straight stitch your machine has) or, like me, you can hand tack it in place. I find these easier to remove later.

Stitching and tacking the back crotch seam
Just like before snip into the curved seam allowance an press the whole seam open and finish.
5. Attach the pockets to the front pieces – RST fold over your pockets matching the notches and press with an iron.

Have your trouser front pieces right sides facing you. Pin the edge of the left pocket making sure you match the notches. Stitch from the upper notch to the lower notch. Repeat on the other side for the right pocket.

Pockets pinned to trouser front
6. Attach the pockets to the back pieces – Things are going to get a little unwieldy now as we attach the back trouser pieces to the pockets! Place the back of the trousers right sides up and lay down the front piece over them. The wrong sides of the front trousers should be facing you. Pin the unstitched, edge of the pocket to your trouser backs, matching the notches. Stitch carefully from upper notch to lower notch.

7. Seal the pocket bags – Have the pockets on the outside of the trousers and pin together the bottom of the pockets. Stitch with a 1.5cm seam allowance.

Pockets on the outside!

Sew the bottom of the pockets to seal
8. Sewing the trouser legs – Pin the side seams together and stitch from the top of trousers at the waistline to the first pocket notch and back stitch here. Cut your thread and restart stitching from the bottom pocket notch (don’t forget to backstitch!) and stitch all the way to the hem line at the bottom. Repeat for the other side. Press the seam open.

Keeping the trousers inside out, flip the pocket so it’s lying across the trousers and stitch to the trouser top. Use a 1cm seam allowance. A machine basting stitch is fine as the waistband will be stitched here later.

Pin the inside leg seams. Starting at the crotch seam, stitch down the inside leg until you get to the hem, backstitching at the start of the seam. Repeat on the other side. Press the seams open.

We have a garment that resembles trousers! Just the waistband, zip and hem to go!
9. Attaching the waistband – Turn your trousers right way out. RST pin the bottom edge of the waistband to the trouser waist starting and ending at the centre back seam (where we will install the zip). Make sure you leave a small amount overlapping the centre back seam at both ends of the waistband. This will help to neaten the area later. Stitch with a 1.5cm seam allowance.

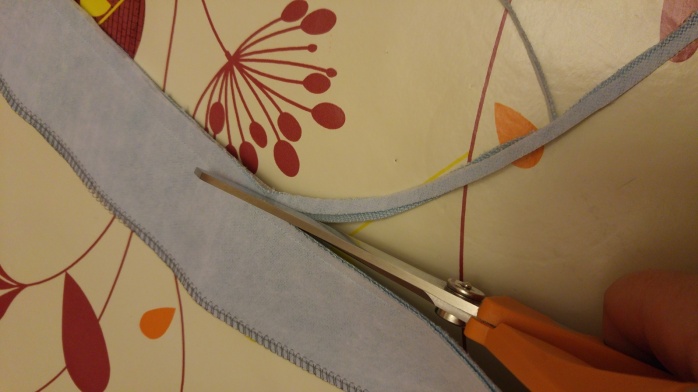
10. Installing the zip – Turn your trousers inside out. The area where the zip is going should be pressed open. Pin and then tack your closed zip to the tacked seam allowance. Make sure the top of the zip pull comes the waistband middle just below the seam line.

Turn your trousers right sides out to sew on the zip. I’m using an adjustable zipper foot but the zipper foot that came with your machine will be fine too! From the right side, sew the zip down the left side from the waistband to the zip notch. Make sure your foot fits right against the zip teeth. You will be able to feel this quite easily. Repeat on the right side of the zip.

Remove your tacking stitches.
Tuck in the overlap from the waistband to leave a nice, neat edge. Pin this to the zipper tape as shown in the photo below. Slip stitch this waistband edge to the zipper tape. To do this thread a needle and tie a knot at the end of the thread. Sew into the fold of the hem between the two layers so the point comes up through the fold (see second photo below). Take a tiny stitch into the zipper tape to secure. Repeat this process all the way along the fold. Your stitches should be invisible from all angles!

Your waistband is now done although you may wish to secure it in place in a few areas. I placed a few hand stitches in the waistband to secure it to the seam allowances and the darts.
11. Hemming your trousers – There are many ways to hem your trousers so choose a method that best suits your fabric. If you’ve got a lovely posh fabric then you’ll want to slip stitch the hem by hand (like with the waistband above) so you have an invisible hem. If you’re going for more casual trousers then a double turned hem is fine. There is a 3cm hem allowance included with this pattern. Turn up the hem 1cm and press in place. Fold another 2cm and press, pin and top stitch the hem in place.
My trousers sit below my natural waist so I needed a slightly larger hem allowance (6cm).

For my lovely linen I decided to blind stitch my hem in place. This gives an almost invisible appearance from the outside and it requires a blind hem foot for your sewing machine. Again, there are many online resources that will show you how to do this. I use this tutorial to help.

Congratulations! You’ve got a brand new pair of tousers!

Well first congrats on being a sew simple blogger. Second, gosh what a lot of work you put into this post! It was like a sewalong in a single post. 🙂 well done and well done for making a fabulous pair of trousers. They will be lovely for summer when it arrives.
Thank you so much. It’s a big relief it has gone down well! I wore my new trousers today and they’re really comfy. A shame it’s such a horrid day -the bottoms of them are now filthy!
Congratulations this is brilliant. What a massive blog and so much detail. Thank you K xXx
That’s good to hear – thank you! This is the cut down version! I just need to work on my photography skills now… 📷
Trousers look great – well done too on your step by step instructions. Will this be a monthly thing from now on?
Thanks very much. Yes, the current plan is that this will be a monthly thing so any feedback is greatly appreciated!
What a fab tutorial! Your photos are fantastically clear, well done! And you have a great, new pair of trousers too. Lovely colour!
Ah thank you! That’s great to hear as I was a little nervous about posting this! The trousers have turned out really well and they’re very comfy too!
Wonderfully complete tutorial – thank you for all the lovely photos, and special thanks for putting together the tutorial! The link to the pattern is specially helpful.
Thanks for your lovely feedback – that’s great to hear. I’ve never done anything like this before so I was a little nervous posting this!
You did great!
Pingback: #MMMay16 Week 4 | applebymakes
Very helpful and some lovely trousers at the end !
Thanks very much for commenting. I’m glad you like it!
Nicely done on the tutorial! I love seeing step by step photos.
Thanks for your feedback. I’m pleased you liked the photos as I wasn’t sure if it was a bit overkill! It is a very long post!
Love your palazzo pants! Beautifully made and documented. Thank you sharing such a comprehensive tutorial, I just might see a pair of these in my future, and I’ll be following your instructions.
Your comment has made me so happy! Thank you! 😃
these are awesome!!
Thanks very much 😃
Pingback: 2o16 | applebymakes
Pingback: Simple Sew Colour-block top tutorial | applebymakes
Pingback: Me Made May 2017 Week 3 | applebymakes
Thanks so much for your very detailed post
You’re very welcome! I’m glad you liked it.
Pingback: The Mandy Boat Tee | applebymakes
The pattern is no longer a working link. Could you post it some other way?
Thank you for pointing this out to me. The Simple Sew website seems to have had an overhaul and I can no longer find the pattern. This may be temporary, but I’ve removed the link for now.
Hello! I’ve come to your blog from sew simple, after I ordered this pattern! I’m a real beginner, and your blog is great! I’m just awaiting my fabric and I can get going. Thank you so much!
Fantastic! I’d love to see your finished trousers. Are you on Instagram? Thanks for stopping by 🙂
Pingback: How to sew a crop top and palazzo pants for kids